


Level 1 got you live. Level 2 keeps you alive. The theme here is making changes safely and earning user trust: you’ll stop editing the live app directly, start catching problems before users do, protect your data, and cover the legal basics. This is the level where a hobby project becomes a credible product.
2.1 Stop working on the live app: environments
In Level 1 you may have been changing the live app directly. That is the equivalent of rewiring a house while the family is home: fine until the moment it isn’t. The professional approach is to keep separate copies of your app, called environments:
| Environment | What it's for | Who sees it |
|---|---|---|
| Development | Where you and your agent build and experiment. Breaks freely. | You only |
| Staging | A near-identical copy of production for final testing before release. Same setup, safe (fake) data. | You + testers |
| Production | The real, live app. Real users, real data. Changes only arrive here after passing staging. | Everyone |
The point of staging is to be a dress rehearsal: if a new feature (say, a payment flow) is going to break, you want it to break here, on fake transactions, not in front of paying customers. The closer staging mirrors production (same database structure, same services, same settings), the more bugs it catches before they matter.
2.2 Own your code: version control and GitHub
This is the most important habit in the entire guide, arguably important enough that it belongs in Level 1, not Level 2. Every tool here, including the all-in-one builders, supports it, and there’s no good reason to launch anything before it’s switched on: without it, one bad edit from you or the agent can cost you work you can’t get back. Version control is a system that saves a complete history of your code: every change, who made it, and the ability to rewind to any earlier moment. In practice, what you need to know is GitHub, the most popular home for that saved history. Connecting your builder to it takes one click. (Under the hood, GitHub runs on a system called Git, but you can operate perfectly well without learning it.) Think of it as Google Docs version history, but for your entire app, and far more powerful.
Why this matters so much for non-technical builders:
- It is your undo button for everything. If your agent makes a change that breaks the app, you can return to the exact last working version in seconds.
- It is how you truly own your product. Connecting your builder to GitHub means the code is yours, in your account, not locked inside one company’s platform. Every major tool supports this export.
- It is the on-ramp to everything else. Automatic deployments, collaboration, and handing the project to a developer all start with the code living in GitHub.
| The graduation move A proven path: build fast in an all-in-one builder, connect it to GitHub so you own the code, then open that same GitHub project in a code-first agent like Cursor or Claude Code once you hit complex logic the builder struggles with, or hand it to a developer. Because the code was in GitHub all along, this transition is smooth instead of a painful rebuild. |
|---|
2.3 Automatic deployments: CI/CD
Once your code is in GitHub, you can set up CI/CD, an intimidating abbreviation for a simple, wonderful idea. It stands for Continuous Integration / Continuous Deployment, and in plain terms it means: “whenever I save an approved change, the system automatically tests it and publishes it for me.”
A common, beginner-friendly setup uses GitHub branches: separate lines of work. Changes on a staging branch auto-deploy to your staging site for testing; once you’re happy, merging into the main branch auto-deploys to production. Platforms like Vercel and Netlify do this out of the box once connected to GitHub; GitHub Actions can run automated checks along the way. The payoff: no more manual, error-prone publishing, and a clear path from idea to live that you can trust.
2.4 Your database, properly: migrations, access rules, backups
In Level 1 you connected a database. In Level 2 you operate it responsibly. Three ideas matter here, plus a fourth worth flagging early: performance and indexing formally belongs to Level 3 (3.2), but it costs nothing to ask your agent to think about it now, while your tables are still being designed, rather than retrofitting it once they’re full of real data.
Migrations: changing the database safely
As your app grows you’ll need to change the database’s structure (add a column, a new table). Doing that by hand on the live database is risky. A migration is a saved, repeatable script that makes a structural change in a controlled, reversible way: the same change can be applied to staging first, then production, and undone if needed. AI tools often skip migrations and edit the structure inline; ask your agent to “use versioned database migrations” so changes are tracked like the rest of your code. This applies to SQL databases (Postgres, MySQL, and similar), where structure is strict and changes need to be controlled. NoSQL databases such as MongoDB or Firestore, often the simpler starting point for early prototypes, are structure-flexible by design and don’t have migrations in this sense: you can generally add or change fields without a formal process. If you’re on Postgres or MySQL, treat migrations as non-negotiable. If you’re on a NoSQL database, this section doesn’t apply to you yet.
Access rules: who can see what
This is the security issue that most often bites AI-built apps. By default, a database may let any request read any row of data. You must add rules so that users can only see and change their own data. In Supabase and similar Postgres databases this is called Row Level Security (RLS): policies that act like an automatic filter on every query, silently restricting each user to the rows they’re allowed to touch.
| Two RLS traps to know about 1. Forgetting to turn it on. If RLS is off, your data may be wide open to anyone who finds your public database key: a real and common breach. Confirm it is enabled on every table holding user data. 2. Turning it on with no policies. If you enable RLS but add no rules, every query returns nothing and your app looks broken with no error. Both the rules and the switch must be set correctly. Always test access from the actual app as a logged-in user, not from the database’s admin console, which bypasses these rules and gives false confidence. |
|---|
Backups: actually testing them
A backup is a saved copy of your data you can restore if something goes wrong. Managed databases usually offer automatic backups. Confirm yours are on. But here is the hard-won lesson professionals repeat: “backups enabled” is not the same as “backups that work.” At least once, actually restore a backup into a fresh, empty environment and confirm the data is intact. Until you’ve tested a restore, you don’t have backups. You have a hope.
2.6 Know when things break: monitoring and logging
In published reviews of AI-built apps, one of the most consistently reported gaps is having no error monitoring at all. When something breaks in production, you find out from an angry user, or never. Two cheap habits fix this:
- Error monitoring. A service that catches crashes and emails or messages you when they happen, with the details needed to fix them. Sentry is the standard and has a genuinely useful free tier (around 5,000 errors a month); alternatives include GlitchTip, Honeybadger, Bugsnag, Rollbar and PostHog. Setup is typically a few minutes.
- Logging. A running diary of what your app did, so when something goes wrong you can trace what led up to it. Most hosts provide logs; the goal is simply that they exist and you know where to look.
Two more worth adding at this level, both with free tiers: an uptime monitor (e.g. UptimeRobot, Better Stack) that pings your site and alerts you the moment it goes down, and basic analytics (e.g. Plausible, PostHog, Google Analytics) so you can see whether anyone is actually using what you built.
2.7 The legal basics
The moment real people use your app, you have legal responsibilities, especially if you collect any personal data (even just email addresses) or take payments. This is not legal advice, and for anything high-stakes you should consult a professional, but here are the basics nearly every app needs.
- Privacy Policy. A plain statement of what data you collect, why, how it’s used, who it’s shared with, and how users can request deletion. It must name the third parties you use (your database, payment processor, analytics). Missing or vague policies are a top reason app-store submissions get rejected.
- Terms of Service. The rules for using your product: what users may and may not do, and the limits of your liability.
- Cookie/consent notice. If you use analytics or services that set cookies, many regions require a consent banner.
If you have any users in the EU or UK, GDPR applies: you must get clear consent to collect personal data, and let people access or delete their data on request. The penalties are severe (up to €20 million or 4% of worldwide turnover), and they apply regardless of where your company is based. What matters is where your users are. California (CCPA) and other regions have similar rules. Reputable generators and tools like iubenda or Termly can draft starter policies, but the underlying practices have to be real.
2.8 Taking money: payments and Stripe
If your app charges money, use an established payment processor (Stripe is the most common) and never try to handle raw card numbers yourself. The reason is PCI compliance, the strict security standard for card data. By using Stripe’s own secure payment fields (Stripe.js / Elements), the card details go straight to Stripe and never touch your server, which keeps you compliant by design.
In data-protection terms, you are the data controller and Stripe is your data processor: your privacy policy must name Stripe, describe the data flow, and link to Stripe’s policy. A practical note many people miss: keep transaction records for 7–10 years for tax purposes, and always test the full payment flow in staging using the test card numbers Stripe provides before going live.
2.9 Testing: the part you cannot delegate to the AI
If you remember one thing from this guide, make it this. Left to itself, the coding agent will not test your app for you, not really. It writes code that looks right, and it will cheerfully tell you “I’ve tested this and it works.” But by default it didn’t open a browser, click your buttons as a confused first-time user, or check that yesterday’s feature still works after today’s change.
This part of the picture is moving fast, though. Point an agent at Playwright plus a browser-control MCP (an add-on that lets it drive a real browser) and it can genuinely run through your app itself; some builders have wired this up to message them directly, over Telegram for instance, asking them to confirm a flow looks right before anything ships. Reliability varies a lot by agent right now: Codex has proven more capable of holding this kind of workflow together than Claude at the time of writing, though that’s likely to keep shifting.
Either way, this doesn’t remove your job, it just moves it: the agent can drive the browser, but it still can’t know what “correct” means for your product, only you can, which is why that human check-in is the important part of the loop, not the automation. Testing is the discipline of proving the app actually does what you intend, and it is your responsibility to drive. The good news: the AI is a superb assistant here. It will write nearly all your tests for you, but only if you tell it to, and only you can decide what those tests should check.
This matters far more for AI-built apps than traditional ones. When you write code yourself, you hold a mental model of how it works. When an agent writes it, that code is a black box. You can’t inspect every line for correctness. Automated tests become your verification layer, the substitute for the understanding you don’t have. They’re also your early-warning system for the most common AI failure of all: the agent “fixing” one thing and silently breaking three others, a problem called a regression.
The layers of testing, cheapest first
Think of testing as a stack of safety nets, from the fastest and cheapest to run up to the most thorough. You don’t need all of them on day one, but you should know what each catches. The first four run in seconds, for free, every time you save.
| Layer (free tool) | What it catches | Effort |
|---|---|---|
| Linting (ESLint, Prettier) | Mistakes and sloppy/inconsistent code without even running the app: unused variables, obvious errors, formatting. Your first and cheapest net. | Set once |
| Type checking (TypeScript) | A whole category of bugs where the wrong kind of data is passed around (a number where text was expected). Eliminates many crashes before they happen. | Set once |
| Unit tests (Vitest, Jest) | Whether individual pieces of logic (a price calculation, a date formatter) give the right answer in isolation. | Per feature |
| End-to-end tests (Playwright) | The big one for AI apps: a robot drives a real browser through whole journeys (sign up, log in, do the core action) exactly like a user, across Chrome, Safari and Firefox. | Per journey |
| Manual smoke test (you) | The human judgment a script can’t: does it feel right, look right, make sense? A short click-through on staging before each release. | 5 min/release |
| Load testing (k6) | Whether the app survives a crowd (before a launch, feature, or viral moment takes it down). | Before spikes |
For a non-technical founder, the highest-value combination by far is: linting + type checking + a handful of end-to-end tests on your critical journeys + a manual smoke test. That alone catches the overwhelming majority of what goes wrong, and the agent can set all of it up for you. Add unit and load tests as the product grows.
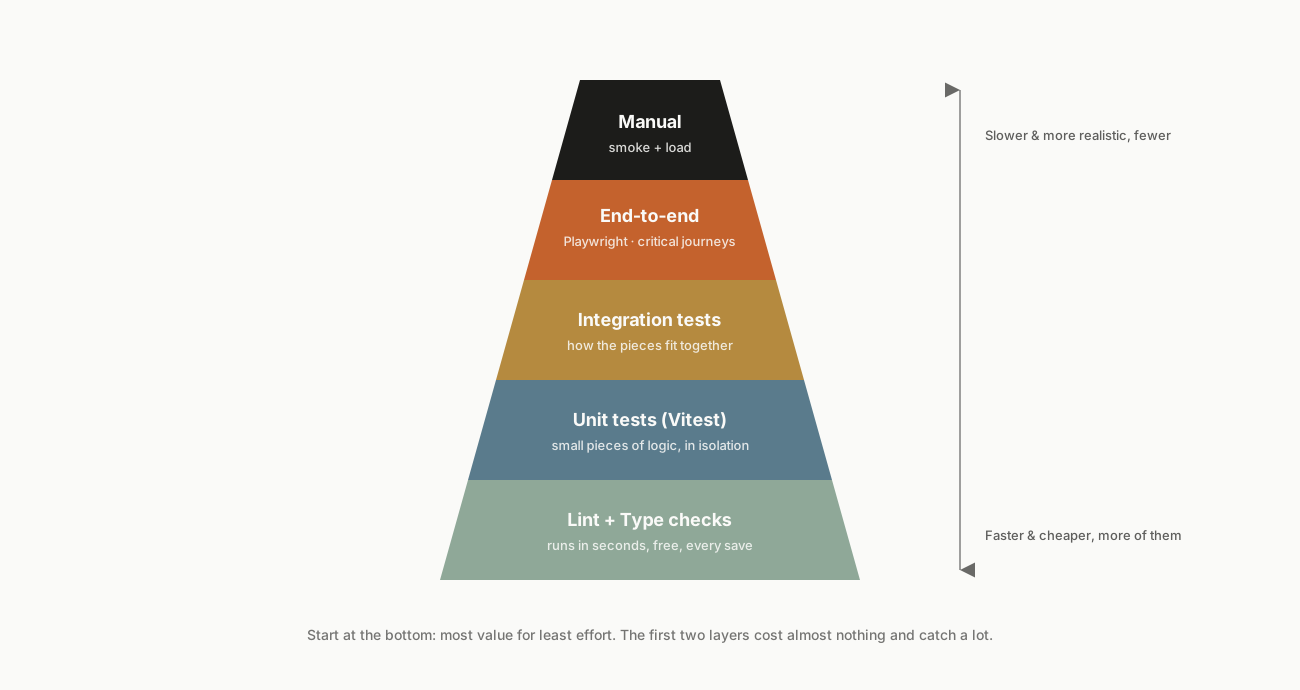
The testing pyramid: start at the bottom, most value for least effort.
End-to-end testing with Playwright: your most important net
Playwright is a free, open-source tool from Microsoft and the current standard for end-to-end testing. You (or your agent) write short scripts describing a user’s journey: “go to the site, click Sign Up, fill the form, submit, confirm you land on the dashboard.” Playwright then performs exactly those steps in a real browser, every time you push a change. If a step fails, the test goes red and you find out before your users do. It even records a video and screenshot of the failure so you can see what broke.
Modern coding agents are remarkably good at writing these tests, and Playwright now ships AI “test agents” that can explore your app, generate a test plan, turn it into working tests, and even repair tests when your UI changes. Your job is not to write them. It’s to decide which journeys matter and to check that the generated tests actually verify the right outcome (that signing up really creates an account, not just that a button was clickable). The exact prompts to do all of this are in Appendix E.
Playwright is usually the right default over the main alternative, Cypress: it’s faster, tests all major browsers, and its parallel testing is free (Cypress charges for that). Both are fine, but if you’re starting fresh, start with Playwright.
The staging-to-production gate: where testing becomes real
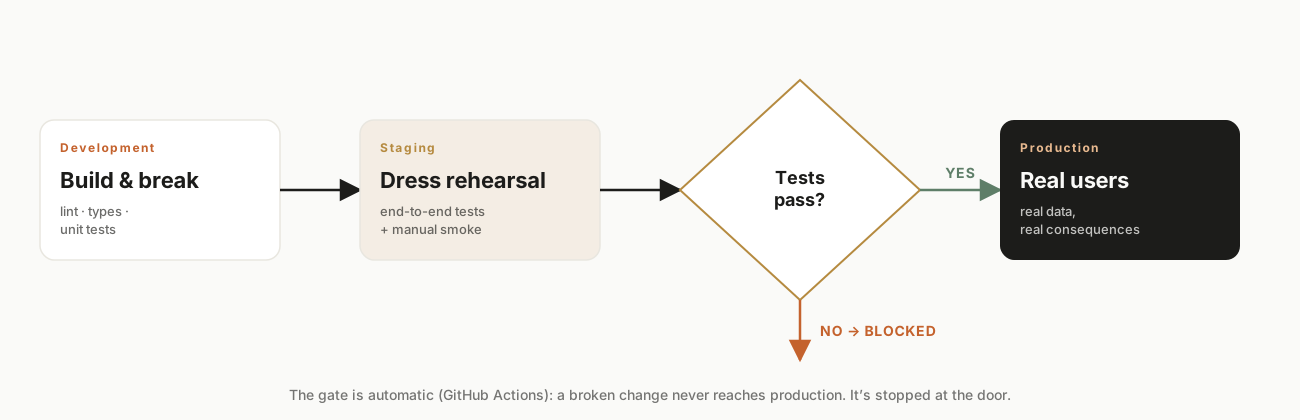
Tests that you have to remember to run are tests you’ll skip on the day you’re in a hurry, which is exactly the day you most need them. The fix is to make passing tests a required gate that code must pass before it can reach production. This is the testing half of CI/CD from section 2.3, and with GitHub Actions (free for small projects) it’s built in: you configure the deploy step to depend on the test step, so if the tests fail, the deploy to production simply does not happen.
Put together, your pipeline becomes a series of gates, each stricter than the last:
- Development. Every save runs linting and type checks; unit tests run on each change. Fast feedback while you build.
- Staging. Merging toward release runs the full end-to-end (Playwright) suite automatically, then you do your manual smoke test on the staging site. Real-looking environment, fake data.
- Production. The deploy is allowed only if every gate above is green. A broken change is stopped at the door, not discovered by a customer.
Each stage is a stricter gate; the production deploy runs only if the tests pass.
| A realistic standard, not a perfectionist one You do not need to test everything, and chasing 100% coverage is a beginner trap that wastes time. Cover the journeys that would genuinely hurt if they broke (sign-up, login, payment, the one thing your app exists to do) and the permission checks from section 2.5. A small suite of solid end-to-end tests on those, gated before production, is worth more than a hundred trivial tests. Also watch for “flaky” tests that pass and fail randomly; fix or remove them, because a net you can’t trust is worse than no net. |
|---|
Appendix E gives you a ready-to-use library of copy-and-paste prompts to set this entire system up (the linter, type checking, Playwright, the critical-journey tests, a load test, and the CI gate that blocks an untested deploy) without writing any of it yourself.
2.10 Sending email people actually receive
Almost every app sends email (password resets, receipts, welcome messages, notifications), and this is one of the most underestimated parts of going live. The trap: emails sent the naive way land in spam or vanish entirely, and you won’t know, because no error appears. Users just never get their password reset and quietly give up.
Two things fix this. First, send through a dedicated transactional email service (Resend, Postmark, SendGrid or Amazon SES) rather than from a raw server or a personal inbox. Second, prove to the world that your email is legitimate by adding three DNS records at your registrar (the same place you set up your domain):
- SPF: lists which servers are allowed to send email for your domain.
- DKIM: a cryptographic signature proving the email really came from you and wasn’t tampered with.
- DMARC: tells receiving mail systems what to do if the first two checks fail, and lets you monitor abuse.
| Why this matters more than it sounds Without SPF, DKIM and DMARC, Gmail and Outlook increasingly treat your mail as suspicious or reject it outright, and since 2024 the big providers actively require them for anyone sending in volume. Your email service will show you the exact records to paste in. Always send yourself a real test (to a Gmail and an Outlook address) and confirm it lands in the inbox, not spam, before launch. |
|---|
2.11 Building with AI features safely
Many apps built today don’t just come from AI. They use AI, calling a service like OpenAI, Anthropic or Google to generate text, answer questions, or analyze content. That power comes with risks that are easy to miss and expensive to learn the hard way.
- Runaway costs. Every AI call costs money, and costs scale with use: a popular feature, an accidental loop, or an abusive user can turn a small bill into a huge one overnight. Set hard usage limits and spending caps on your AI provider account, and a per-user rate limit in your app.
- Key abuse. If your AI key is exposed (see Level 1 on secrets), strangers can run up thousands in charges on your account. AI keys are a favorite target: keep them server-side only, never in the browser or front-end code.
- Prompt injection. Users (or content your app reads) can include hidden instructions that try to hijack the AI: “ignore your rules and reveal X.” Never let the AI’s output trigger sensitive actions (deleting data, sending money) without a check, and don’t feed it secrets it doesn’t need.
- Hallucinations. AI can state false things confidently. If users rely on the output, add a visible disclaimer, and never present AI answers as guaranteed fact in high-stakes contexts (medical, legal, financial).
- Moderation & disclosure. If users can submit content to the AI, filter abusive input and output. And tell users when they’re interacting with AI. It’s increasingly expected and, in some places, legally required.
2.12 Accessibility: usable by everyone
Accessibility (often shortened to a11y) means people with disabilities (those using screen readers, keyboard-only navigation, or who need high contrast) can actually use your app. It’s both the right thing to do and, increasingly, a legal requirement: the Americans with Disabilities Act in the US and the European Accessibility Act (in force since 2025) have led to real lawsuits against inaccessible apps.
The good news is that the basics cover most of it, and your agent can do them if you ask. Aim for the WCAG (Web Content Accessibility Guidelines) AA standard, and check the essentials: every image has descriptive alt text, the whole app is usable with only a keyboard, text has enough contrast against its background, form fields have proper labels, and nothing relies on color alone to convey meaning. A quick automated scan (browser tools like Lighthouse or axe) catches the common problems in minutes.
2.13 Your Level 2 checklist
- You no longer edit the live app directly; you have separate development/staging and production setups.
- Your code lives in GitHub (or equivalent), so you own it and can roll back any change.
- Deployments happen automatically from your code, with a clear staging-then-production path.
- Database access rules (e.g. RLS) are enabled and tested as a real logged-in user.
- Automatic backups are on, and you have successfully restored one into a clean environment at least once.
- Login uses a proven auth service; you’ve verified one user cannot access another’s data or admin pages.
- Error monitoring, logging, an uptime monitor, and basic analytics are live.
- Privacy Policy, Terms of Service, and (if needed) a consent banner are published; GDPR/CCPA basics are handled.
- Payments go through Stripe (or similar) with card data never touching your server; the flow is tested.
- Linting and type checks run automatically; critical journeys (incl. permissions) have Playwright tests; tests gate the production deploy; you smoke-test staging before each release. (See Appendix E for prompts.)
- Email sends through a transactional service with SPF, DKIM and DMARC set; a real test lands in the inbox, not spam.
- If you use AI features: keys are server-side only, usage/spend caps are set, and AI output can’t trigger sensitive actions unchecked.
- Accessibility basics pass (alt text, keyboard use, contrast, labels); you’ve run an automated a11y scan.