

This level has one job: get your app onto the public internet in a way that is safe enough for real people to use. Everything here is non-optional. If you do only Level 1 and nothing else, you will have a live product: a small, simple one, but a real one.
1.1 What “production” actually means
Think of two versions of your kitchen. One is the test kitchen where you try recipes, make a mess, and nobody minds if a dish fails. The other is the restaurant: paying guests, real expectations, and a bad night has consequences. In software those two worlds have names.
Your prototype (the app running inside your coding tool, on your own machine) is the development environment (the test kitchen). Production is the live version that real users reach over the internet (the restaurant). “Going to production” means moving your app from the first world to the second, and the rest of this guide is the difference between the two.
The reason this is a real step and not just a button is that your laptop is not the internet. When the app runs in your tool, it is using your computer, your files, and test data. For strangers to use it, the app has to live on a computer that is always on, reachable by a web address, protected by encryption, and connected to a real place to store information. Setting that up is the work of Level 1.
1.2 Hosting: where your app lives
A host (or hosting provider) is simply a company that runs an always-on computer in a data center and lets your app live on it, so it is available 24/7 without your laptop being open. The technical word for that always-on computer is a server. You will also hear “the cloud,” which is just a friendly name for “someone else’s servers that you rent by the month.”
In practice, you’ll rarely deal with a server directly. Most of the platforms in this guide (Vercel, Netlify, the compute behind Supabase) are serverless: instead of renting one machine that sits there waiting, you hand over your code and the platform runs exactly the computing power each request needs, then switches it back off. You don’t provision, patch, or restart anything; you deploy, and it scales itself up and down on its own. This is the model you’ll actually be living in day to day, so the word is worth knowing even though the machinery stays out of sight.
There are two pieces to host, and it helps to keep them separate in your mind:
- The front end: the part users see and click (pages, buttons, layouts). It runs in the visitor’s web browser.
- The back end: the engine behind the scenes that stores data, handles logins, and does the real work. It runs on a server.
Modern tools often handle both for you, but knowing the distinction explains why you sometimes hear about “deploying the front end to Vercel” and “the database on Supabase”: those are two different homes for two different parts of the same app.
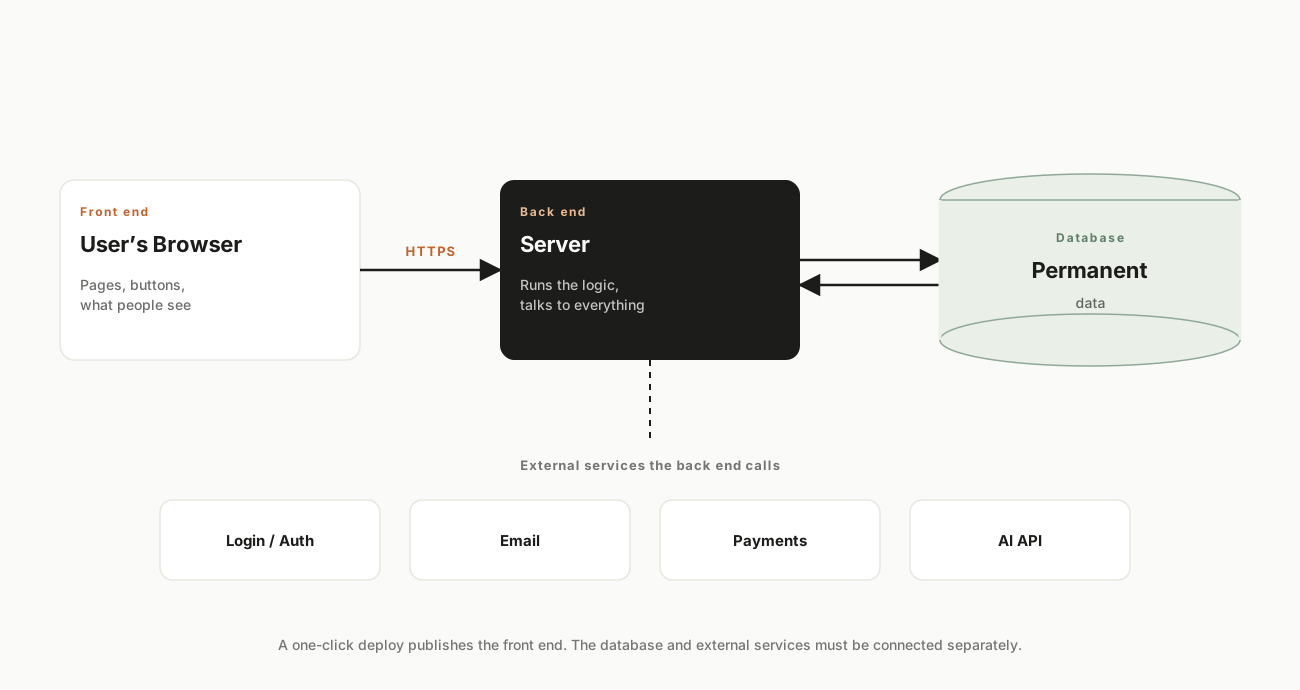
Where your app lives: the front end in the browser, a back-end server, a database, and external services.
Deploying from an all-in-one builder
“Deploy” is the industry word for publish: pushing your app out so it is live. In builders like Lovable, Bolt and Replit, this is close to one click. Lovable publishes to a web address it gives you and supports your own custom domain; Bolt deploys straight from the browser, commonly via Netlify, and hands you a working link instantly; Replit runs your app on its own infrastructure with scaling options built in. The button hides a lot, but the result is genuine: a public URL anyone can open.
| The catch behind the one-click button These tools deploy the app, but the app almost always depends on outside services to truly work: a database, a login system, an email sender, a payment processor. The one-click deploy does not set those up for you. This is exactly where the “technical cliff” appears: the page loads, but signing up or saving data fails because the supporting service was never connected. Level 1 walks you through the ones you cannot skip. |
|---|
Deploying code-first apps
If your agent produced code in files (or you exported it), you point a deployment platform at that code and it builds and serves it. The most common beginner-friendly choices are Vercel and Netlify for the front end. You connect your code, click deploy, and you get a live URL, and from then on, every time you update the code, it can redeploy automatically (you’ll meet that idea properly in Level 2). This space is moving fast, too: dedicated “agent-first” deployment tools that skip the usual platform-and-config dance, built specifically for AI-generated codebases rather than adapted from human developer workflows, are starting to appear. The workflow above is the reliable path today. Expect it to keep getting simpler.
1.3 Your own domain name
When you deploy, you get a free but ugly address like my-app-7f3k.netlify.app. A domain name (such as yourbrand.com) is the real-world address people trust and remember. You buy one (typically $10–$15 a year) from a registrar such as Namecheap, Cloudflare, GoDaddy or Google Domains.
Connecting it involves DNS (the Domain Name System), which works like the internet’s phone book: it translates your friendly name into the actual location of your server. You do not need to understand it deeply. Your host shows you a few records to copy, and you paste them into your registrar’s settings:
- An A record points your root domain (yourbrand.com) at your host’s server.
- A CNAME record points a subdomain (like www.yourbrand.com or app.yourbrand.com) at your host.
After saving, there is a wait called propagation while the change spreads across the internet, usually minutes, occasionally up to 48 hours. If your site doesn’t appear immediately, this is almost always why; wait before assuming something is broken.
1.4 HTTPS: the padlock
HTTPS is the secure version of a web connection: it’s the padlock icon in the address bar, and it encrypts everything traveling between your user and your server so it can’t be read or tampered with in transit. It is powered by an SSL/TLS certificate. The good news: every host mentioned in this guide turns HTTPS on automatically and for free once your domain is connected. You rarely have to do anything except confirm it’s on.
| Non-negotiable Never accept a live site that loads on “http://” without the padlock. Browsers warn users away from it, logins and payments are unsafe over it, and search engines penalize it. If you ever see “Not secure,” fix it before sharing the link. |
|---|
1.5 Where your data lives: the database
A database is the organized, permanent place your app keeps information: user accounts, posts, orders, settings. The key word is permanent. While you were prototyping, your tool may have used fake or temporary data that resets. In production you need a real database so that what users create today is still there tomorrow.
For most apps built this way, the popular choice is a managed database (one a company runs, secures, and backs up for you) with Supabase being the most common companion to vibe-coding tools (others include Firebase, Neon, and PlanetScale). “Managed” matters: it means you are not responsible for keeping the database server patched and alive, which is genuinely hard. The small monthly cost buys back hours of work and a lot of risk.
At Level 1 you only need three things to be true: a real database is connected (not temporary storage), your app successfully saves and reads data in the live version, and you are not the only one who can verify that: test it by signing up as a fake user and confirming the record actually appears.
1.6 Secrets: the most common rookie mistake
Your app uses keys: secret passwords that let it talk to other services (your database, an email provider, a payment processor). The single most common and most dangerous mistake in AI-built apps is hardcoding these keys: writing them directly into the code. If that code is ever shared, exported, or pushed online, the keys go with it, and strangers can run up bills or steal data using them.
The fix is environment variables (often shown as “env vars” or a .env file). These store your secrets separately from your code, in your host’s settings panel, where the app can read them at run time but they never travel with the code itself. Every host and builder has a screen for this, usually “Environment Variables” or “Secrets.”
| Ask your coding agent this, today “Scan the entire project for any hardcoded API keys, passwords, or tokens, and move them all to environment variables.” If a key was ever written into code that left your machine, treat it as compromised and rotate it (generate a new one and delete the old) in the service it belongs to. A leaked key is not fixed by deleting it from the code, only by replacing it. |
|---|
1.7 Your Level 1 launch checklist
Before you share the link with anyone, walk through this list. If you can tick every box, you have a real, safe-enough-to-launch product.
- The app is deployed to a public URL that loads for someone other than you (test on your phone, off Wi-Fi).
- A real, managed database is connected, and creating data in the live app actually saves it.
- HTTPS is on: you see the padlock, not “Not secure.”
- No secrets are hardcoded; all keys live in environment variables, and any previously exposed key has been rotated.
- A custom domain is connected (or you’ve consciously decided to launch on the free address for now).
- You signed up as a fake user end-to-end and the core action of your app worked.
- You know how to make a change and re-deploy it (you’ve done it at least once).